
We’ll need three libraries for this project. We use pandas to read data from an Excel file, but the pandas library is not a must-have if your data is elsewhere or if you prefer to extract customer data another way.
python-docx for automating .docx (e.g. MS Word, Google docs, etc) file
pywin32 for interacting with Windows APIs
pip install pandas python-docx pywin32The library you’ll hear is docx ; however, for installation purposes, it’s python-docx .
So, note the following difference:
pip install python-docx import docxSince the docx library creates .docx files, you don’t have to use MS Word. Both Google Docs and LibreOffice are free alternatives that support .docx files, and they are as good as the MS Office suite.
To create a .docx file, we need to create a Document object first. Then inside the document object, we can add various elements such as headings, paragraphs, pictures, etc. In the code below, the Inches object is used to define the size of an element, e.g. a picture.
from docx import Document from docx.shared import Inches document = Document() document.add_picture('brand_logo.png', width = Inches(1)) document.add_heading('Invoice', 0)The Run object represents any text – it can be a letter, a word, a sentence, or a full paragraph. Visually, each red box in the below picture represents a separate Run . We use .add_paragraph() to start a new sentence/paragraph “This is a “. Then we can keep adding new Runs to the existing Paragraph object.
Once we add a Run , we can also modify its properties such as font, size, color, etc.
The following code will create the above sentence with shown styles.
from docx import Document from docx.shared import Pt, RGBColor document = Document() p1 = document.add_paragraph('This is a ') p1.add_run('MS WORD ').bold = True p1.add_run('document ') eg = p1.add_run('example') eg.font.size = Pt(20) eg.font.color.rgb = RGBColor(0,128,0)Our sample data inside Excel looks like the following:

Of course, we don’t want to send to these guys’ actual email addresses, so I’m using my own test email address.
Essentially, this is our company’s sales data, for example, the first record means: We sold 10 units of Falcon 9 rockets to Elon Musk at a unit price of $1m. Let’s create an invoice for each customer 🙂
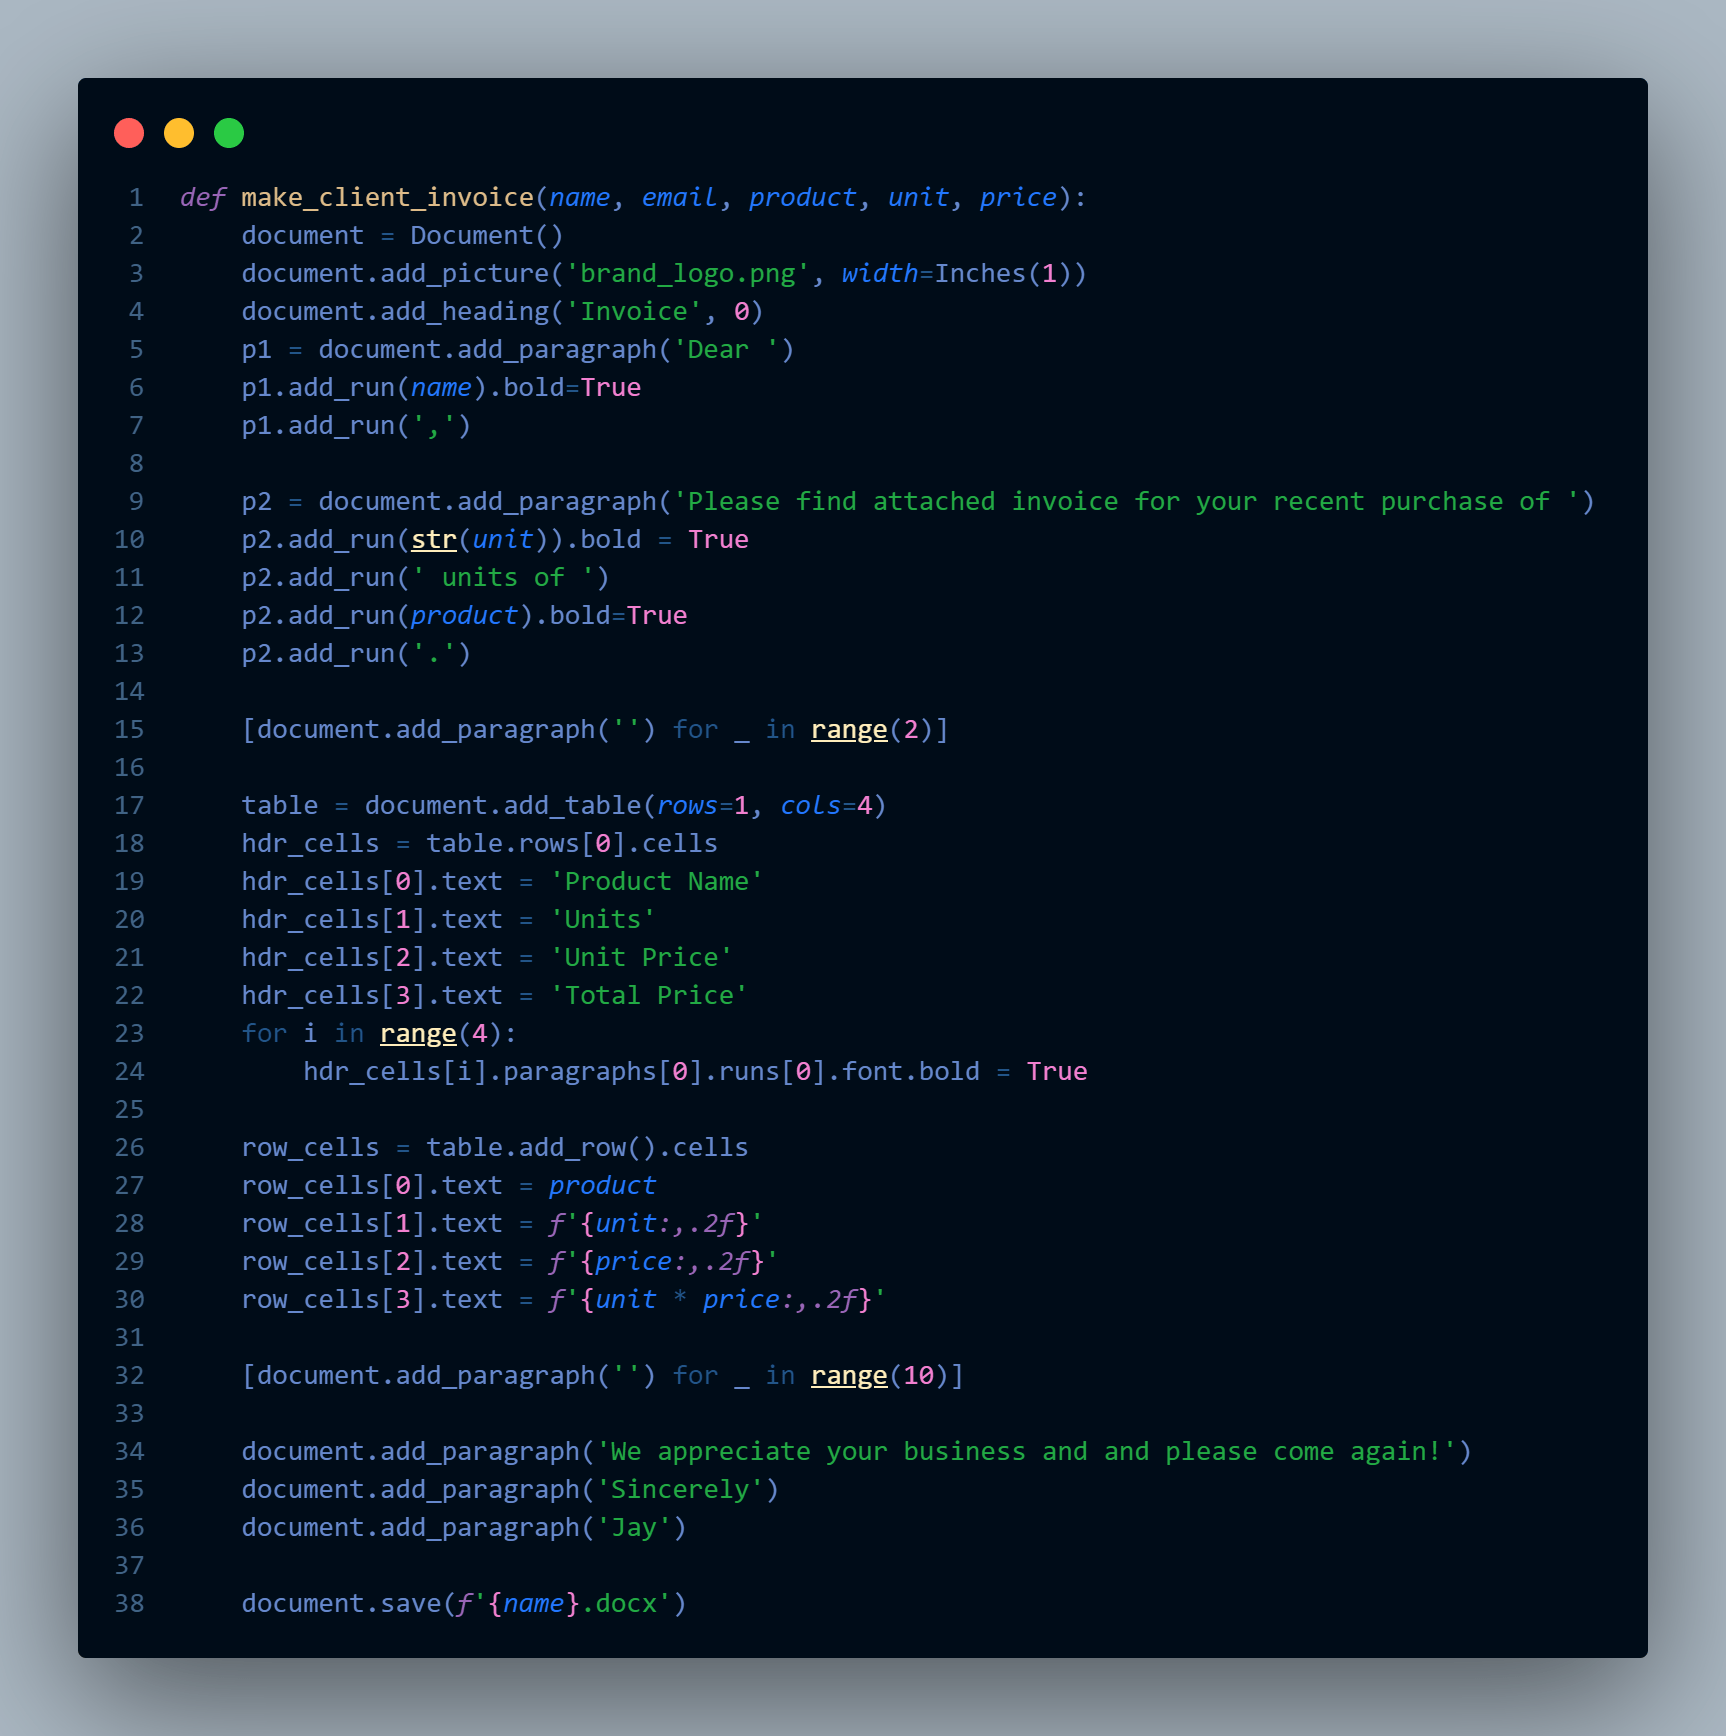
Since this is part of a streamlined process, we’ll write a function that only does one thing at a time. The first step is creating invoices in .docx format. This function will take the following arguments: customer name, email, the product sold to them, number of units, and the unit price.
In the code below:
Let’s test the function, looks good!
make_client_invoice('Elon Musk', 'amznbotnotification@gmail.com','Falcon 9',10, 1000000)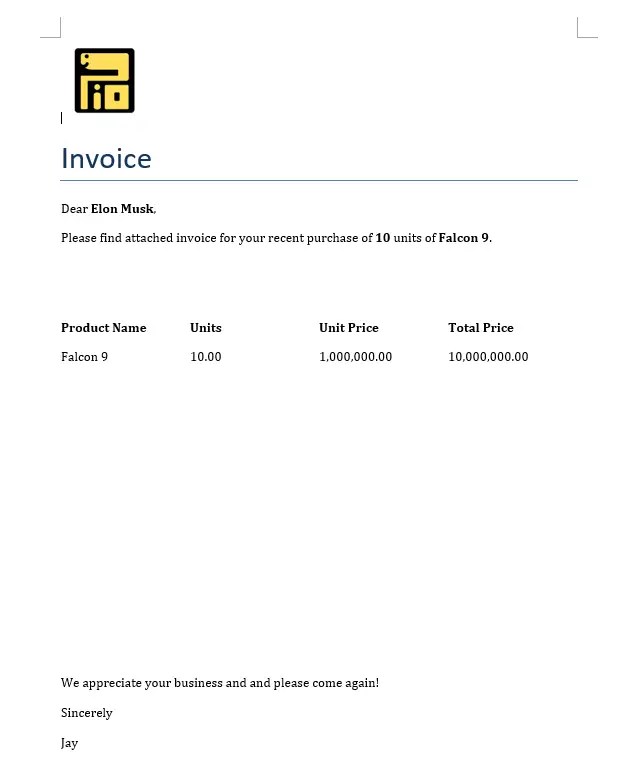
Now we have our invoice in Word, let’s convert it to PDF since that’s the standard format for business documents.
We’ll use the pywin32 / win32com library, this one also got a weird naming between installation name and library name. Note the difference below:
pip install pywin32 import win32com.clientThe win32com is a great library that allows us to control lots of things in the Windows operating system. It can control the Office Suite of apps for example.
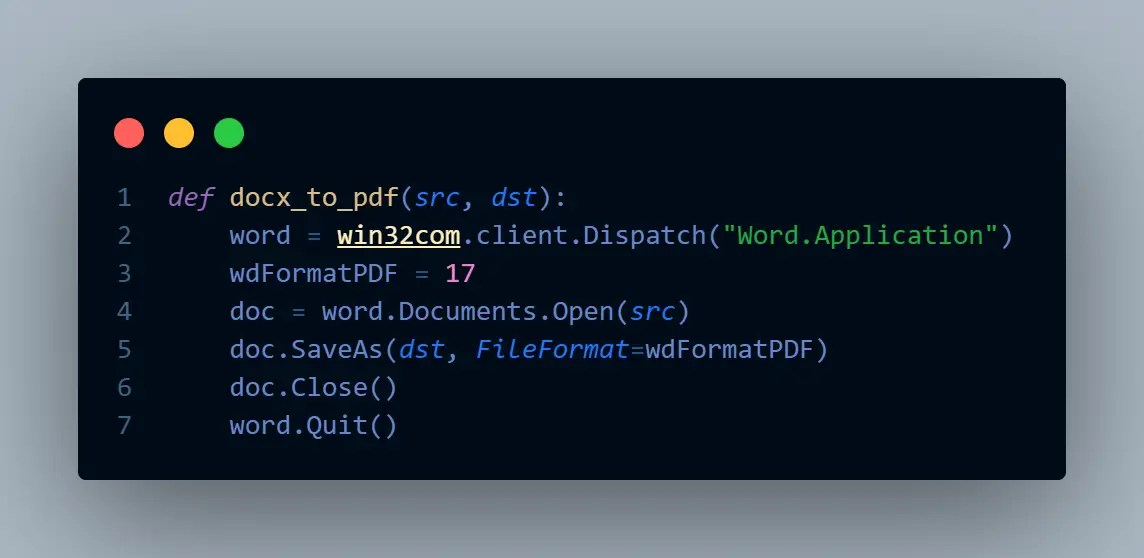
To convert Word (.docx) to PDF format, we essentially open the document using win32com , then Save As PDF format. Easy peasy!
The code below takes an input file path src , then converts and saves a pdf to file path dst .
win32com.client.Dispath("Word.Application") will create a MS Word instance/object inside Python. Replace the Word with Excel, then you’ll have an Excel instance!
The wdFormatPDF = 17 is likely a convention used by VBA, check this list on other file type options we can save to.
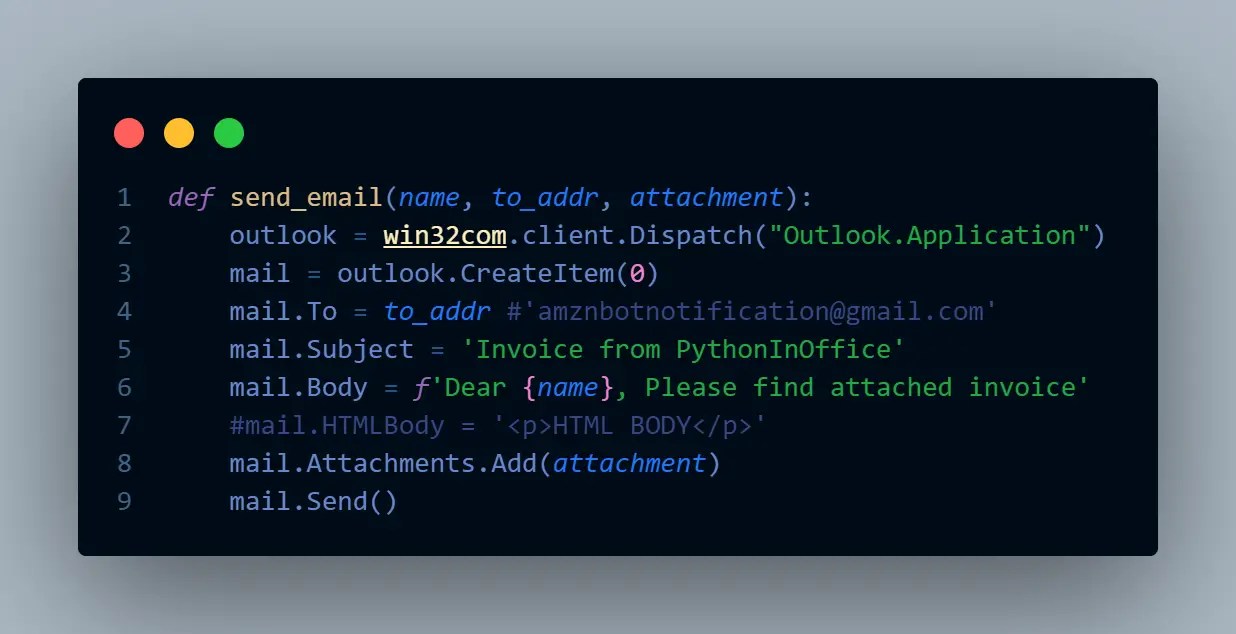
Next, we’ll send out the invoice to our customers! win32com is again our helper to interact with the Outlook App. Note – not the web-based Outlook, but the actual app that’s installed on our computer. This step requires you have Office (especially Outlook) installed on your computer, and logged into an Outlook account. User name and password are not required as long as your Outlook App stays logged in.
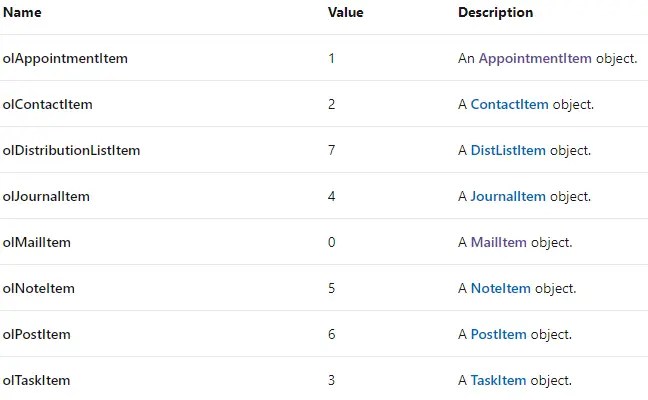
In the code above, line 3 CreateItem(0) means to create a Mail object. See the below table on other possible objects we can create inside Outlook.
To add an attachment, simply pass in the file location similar to line 8.
It appears that we don’t even need to have Outlook App open to send an email using Python. As long as we have previously logged into our Outlook App, it’s good to go. The best part – no credentials or passwords are required, the win32com will just interact with Outlook with your existing settings.
Now I offer the three functions for the three steps of the invoicing system. It’s your turn to try putting it together. You can use a loop to send invoices one by one or build them with other processes. Enjoy!
from docx import Document from docx.shared import Inches import pandas as pd import win32com.client def make_client_invoice(name, email, product, unit, price): document = Document() document.add_picture('brand_logo.png', width=Inches(1)) document.add_heading('Invoice', 0) p1 = document.add_paragraph('Dear ') p1.add_run(name).bold=True p1.add_run(',') p2 = document.add_paragraph('Please find attached invoice for your recent purchase of ') p2.add_run(str(unit)).bold = True p2.add_run(' units of ') p2.add_run(product).bold=True p2.add_run('.') [document.add_paragraph('') for _ in range(2)] table = document.add_table(rows=1, cols=4) hdr_cells = table.rows[0].cells hdr_cells[0].text = 'Product Name' hdr_cells[1].text = 'Units' hdr_cells[2].text = 'Unit Price' hdr_cells[3].text = 'Total Price' for i in range(4): hdr_cells[i].paragraphs[0].runs[0].font.bold = True row_cells = table.add_row().cells row_cells[0].text = product row_cells[1].text = f'' row_cells[2].text = f'' row_cells[3].text = f'' [document.add_paragraph('') for _ in range(10)] document.add_paragraph('We appreciate your business and and please come again!') document.add_paragraph('Sincerely') document.add_paragraph('Jay') document.save(f'.docx') def docx_to_pdf(src, dst): word = win32com.client.Dispatch("Word.Application") wdFormatPDF = 17 doc = word.Documents.Open(src) doc.SaveAs(dst, FileFormat=wdFormatPDF) doc.Close() word.Quit() def send_email(name, to_addr, attachment): outlook = win32com.client.Dispatch("Outlook.Application") mail = outlook.CreateItem(0) mail.To = to_addr #'amznbotnotification@gmail.com' mail.Subject = 'Invoice from PythonInOffice' mail.Body = f'Dear , Please find attached invoice' mail.Attachments.Add(attachment) mail.Send()This is nice tuto!
Thanks.