 Finder Autorecovery path" width="800" height="231" />
To find lost Word documents on a Mac, try searching for the document name in Finder or look in the “Recent Items” list in the Apple menu. You can also try recovering the document from Time Machine or using a data recovery tool.
Once you booted your Mac back from a power failure or other unexpected shutdown, you can check if Word has saved the AutoRecovery file by opening the program. You will see a panel of AutoRecovered items on the left panel of your Word document along with the original file, and you can choose which one you wish to save. Otherwise, you can expect to find your unsaved word document in its AutoRecovery folder. Here are the steps:
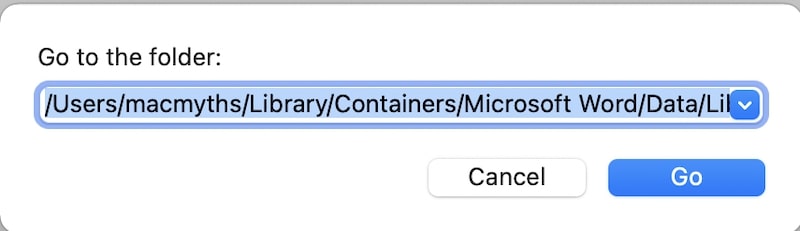
You can find your AutoRecovered files on your Mac by switching to Finder and click Go > Go To Folder (SHIFT + COMMAND + G) and enter Word’s AutoRecover folder path.
Depending on the version of Microsoft Office installed on your Mac the path will be either
/Users//Library/Containers/com.microsoft.Word/Data/Library/Preferences/AutoRecovery/Users//Library/Containers/Microsoft Word/Data/Library/Preferences/AutoRecoveryFinder Autorecovery path" width="800" height="231" />
Replace with your Mac username and paste the path into the Finder window and hit Enter. Note: The AutoRecovery folder is a hidden folder in most cases, which means that you won’t be able to see it if you try to locate it by navigating through Finder. It is best recommended to enter the folder path above to make sure that you can access it.
Once you’re in the AutoRecovery folder, locate the file with the filename “AutoRecovery save of .asd.”
Once you found the file you wish to recover, right-click it and then select Open With > Microsoft Word. Once you successfully opened the file, save the document by clicking on File > Save As and save it to your desired location with your desired file name. Note: Your unsaved Word document will not appear in the AutoRecovery folder if you close your document and click Don’t Save upon the exit message prompt. This is because the application thinks that the AutoRecovery file isn’t needed because you chose not to save the file changes. In this case, your unsaved Word file won’t appear anywhere on your computer.
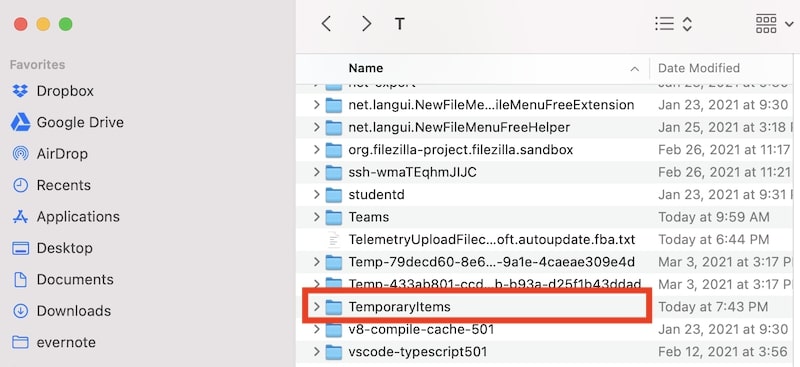
If the first method doesn’t work or you can’t find your unsaved word document in the AutoRecovery folder, your document might be in the “TemporaryItems” folder. This is where MacOS stores its temporary files while working on an application before it saves the final output and removes the temporary file from the folder. In cases of unexpected shutdowns and crashes, the temp files are left inside the folder. To locate the “TemporaryItems” folder:
You will see files with .tmp file extensions in this folder. Locate files with the “Word Work File” filename, and you can open them using TextEdit.
Alternatively, if Method 2 didn’t work, you can check if your lost Word document was saved in the Recovered Items folder in Trash.
Like the TMP folder, macOS salvages the unsaved files and places them into the Recovered Items folder.
To locate the Recovered Items folder:
Note: In some cases, macOS might not have saved your unsaved file and “Recovered Items” might not appear.
Note that not all documents may be 100% recoverable.
This means that it can be guaranteed that you will find your lost or unsaved Word document using the aforementioned methods above, but you might encounter some errors when opening them.
Sudden power outages and computer crashes can potentially corrupt a file, and Word files are not an exception.
This means that having a copy of your unsaved Word file does not necessarily mean that it will display its contents correctly to the last formatting.
In other words, incomplete data from a recovered temporary file might corrupt the lost or unsaved Word file.
However, there is still a chance to recover your document’s contents if it displays a string of gibberish text.
Hopefully, Word will display a more legible version of your damaged Word file. You can expect some slight to major inconsistencies with the formatting.
With this in mind, you can always reduce the risk of data loss in times of unexpected power failure or crash by turning on Word’s AutoSave feature.
On the other hand, relying on AutoRecovery to save your unsaved file still gives a slight chance of full document recovery, so we suggest that you take advantage of Word’s AutoSave feature.
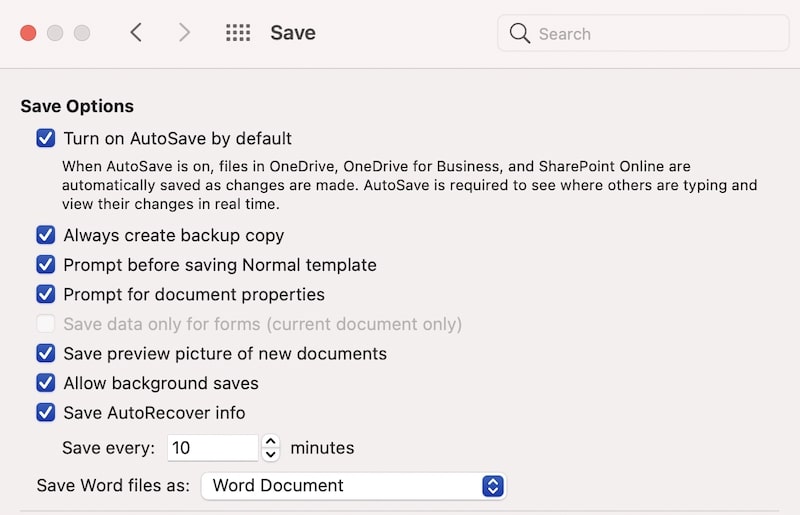
Now that Microsoft Word automatically saves your file as you work on your document, you can rest assured that your document is properly saved as it does the same thing when you manually save your document.
Additionally, if AutoSave is on, relying on recovering your files via the AutoRecovery folder won’t be necessary.
As stated above, despite that lost or unsaved Word documents can be easily located in your Mac, thanks to Microsoft Word’s AutoRecovery and AutoSave features and MacOS’s data recovery solutions, there is still a chance that your file might be corrupted.
However, it is important to keep in mind that we can always reduce the risk of data loss in working with documents by being prepared for future unexpected computer crashes and shutdowns by using Word’s AutoSave feature, especially when working on bigger and more important documents.
Photo credit: ©canva.com
Ujjwal is a tech enthusiast with a special interest in everything Apple! He manages and writes on MacMyths.com where sharing anything and everything related to Apple devices and services is his daily thing to do.
Apple introduced Ethernet ports in MacBook versions 2010 and 2011. After this, the tech giant focused primarily on Wi-Fi connectivity and removed the ports from all its devices. However, if you are.
Are you having trouble with your Macbook trackpad not working? You're not alone. Many Macbook users experience this issue, and it can be incredibly frustrating. So, after testing different methods, I.
Ujjwal is a tech enthusiast with a special interest in everything Apple! He manages and writes on MacMyths.com where sharing anything and everything related to Apple devices and services is his daily thing to do.
I am a participant in the Amazon Services LLC Associates Program, an affiliate advertising program designed to provide a means for sites to earn advertising fees by advertising and linking to Amazon.com. As an Amazon Associate, I earn from qualifying purchases.